> ## Documentation Index
> Fetch the complete documentation index at: https://docs.fynn.eu/llms.txt
> Use this file to discover all available pages before exploring further.
# Checkout Link
> Learn how to create a checkout link and send it to your customers.
With a checkout link, you can create a pre-configured cart for a product and send it to your customers. The customer can then go directly to checkout and complete the purchase.
## Create Checkout Link
Select the product in your product catalog, create a price if not already done,
and click the "Create Checkout Link" button.
Under "After Completion", select one of the options to determine what happens after the purchase.
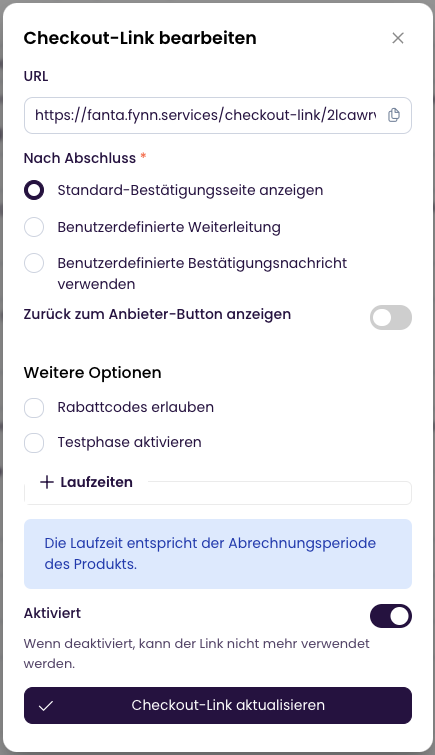 * **Default Confirmation Page**: The customer is redirected to the default confirmation page and receives an overview of their order and the associated invoice.
* **Custom Redirect**: The customer is redirected to a URL you specify.
* **Custom Confirmation Message**: The customer is redirected to the default confirmation page and is shown a confirmation message you specify.
When using a **custom redirect**, you can add placeholders to the URL that will be replaced with URL parameters. More details can be found under [Adding Metadata](#adding-metadata).
**Show Back to Provider Button**: Enable this option if you want the customer to see a button to return to your provider on the default confirmation page after the purchase.
### Allow Discount Codes
Under "More Options", you can specify whether the customer can enter a discount code.
Enable this option if you want the customer to be able to enter a discount code. Otherwise, the field will be hidden.
### Set Trial Period
Under "More Options", you can specify for recurring products whether a trial period should apply to the product.
Enable this option if you want the customer to be able to try the product before purchasing. The amount is not due until the trial period expires.
If the trial period is excluded in the price via Allow Trial Period, this option is ignored.
### Set Terms
Under "More Options", you can specify for recurring products which contract & cancellation periods apply to the product.
The terms are then transferred to the subscription.
For one-time products, this option is irrelevant.
If you do not set any terms, the billing period is used as the contract term and 1 day as the cancellation period.
### Require Company Information
Under "More Options", you can specify whether the customer is required to provide company information.
This way you can ensure that you only sell to companies.
To do this, enable the "Require Company Information" option.
### Make Quantity Changeable
Under "More Options", you can specify whether the customer can subsequently change the quantity of the product in the cart.
Enable this option by checking the "Quantity Changeable" checkbox. This means a product cannot be removed from the cart, only the quantity can be changed.
## Adding Metadata
You can attach metadata to the checkout link to pass additional information.
This metadata is:
* appended as redirect parameters to the custom redirect
* replaced as placeholders in the custom redirect
* passed in the webhook as the `metadata` field
### Attaching Metadata
To attach metadata to the checkout link, add it as URL parameters, e.g., `https://fynn.coreapi.io/checkout-link/xxxxxxxx?metadata[key]=value&metadata[key2]=value2`.
It is also possible to pass a multidimensional array by enclosing the key in square brackets, e.g., `metadata[key][subkey]=value`.
### Placeholders in the Custom Redirect
You can use placeholders in the custom redirect that are replaced by metadata.
To use a specified metadata in the custom redirect, add it in curly braces, e.g., `{{metadataKey}}`.
If you operate a multi-tenant application and want to redirect to a custom URL of the tenant upon redirect,
you can attach the tenant ID as metadata to the checkout link and use it as a placeholder in the custom redirect.
Example URL: `https://{{tenantId}}.example.com/checkout-success`
Example Checkout URL: `https://fynn.coreapi.io/checkout-link/xxxxxx?metadata[tenantId]=acmegmbh`
### Webhooks
The metadata is passed in the webhook as the `metadata` field.
```json theme={null}
{
"metadata": {
"key": "value",
"key2": "value2"
}
}
```
## Create Checkout Session
By default, a new checkout session is created when using the checkout link.
However, it may be useful to create only one checkout session if you:
* want to bundle multiple products in one cart
* want to use the checkout link multiple times
To create a checkout session, add the parameter `session=true`, e.g., `https://my-tenant.coreapi.io/checkout-link/xxxxxxxx?session=true`.
If a checkout session has been created and a checkout link is called without `session=true`, a one-time independent checkout session is created.
The checkout session is valid for 24 hours. After this time, the cart is cleared.
### Retrieve Checkout Session
To retrieve the checkout session without adding another product, call the following
API route: `https://[tenant-username].coreapi.io/public/checkout/cart/current`. Replace `[tenant-username]` with your tenant name.
You will then be redirected to the current checkout session.
* **Default Confirmation Page**: The customer is redirected to the default confirmation page and receives an overview of their order and the associated invoice.
* **Custom Redirect**: The customer is redirected to a URL you specify.
* **Custom Confirmation Message**: The customer is redirected to the default confirmation page and is shown a confirmation message you specify.
When using a **custom redirect**, you can add placeholders to the URL that will be replaced with URL parameters. More details can be found under [Adding Metadata](#adding-metadata).
**Show Back to Provider Button**: Enable this option if you want the customer to see a button to return to your provider on the default confirmation page after the purchase.
### Allow Discount Codes
Under "More Options", you can specify whether the customer can enter a discount code.
Enable this option if you want the customer to be able to enter a discount code. Otherwise, the field will be hidden.
### Set Trial Period
Under "More Options", you can specify for recurring products whether a trial period should apply to the product.
Enable this option if you want the customer to be able to try the product before purchasing. The amount is not due until the trial period expires.
If the trial period is excluded in the price via Allow Trial Period, this option is ignored.
### Set Terms
Under "More Options", you can specify for recurring products which contract & cancellation periods apply to the product.
The terms are then transferred to the subscription.
For one-time products, this option is irrelevant.
If you do not set any terms, the billing period is used as the contract term and 1 day as the cancellation period.
### Require Company Information
Under "More Options", you can specify whether the customer is required to provide company information.
This way you can ensure that you only sell to companies.
To do this, enable the "Require Company Information" option.
### Make Quantity Changeable
Under "More Options", you can specify whether the customer can subsequently change the quantity of the product in the cart.
Enable this option by checking the "Quantity Changeable" checkbox. This means a product cannot be removed from the cart, only the quantity can be changed.
## Adding Metadata
You can attach metadata to the checkout link to pass additional information.
This metadata is:
* appended as redirect parameters to the custom redirect
* replaced as placeholders in the custom redirect
* passed in the webhook as the `metadata` field
### Attaching Metadata
To attach metadata to the checkout link, add it as URL parameters, e.g., `https://fynn.coreapi.io/checkout-link/xxxxxxxx?metadata[key]=value&metadata[key2]=value2`.
It is also possible to pass a multidimensional array by enclosing the key in square brackets, e.g., `metadata[key][subkey]=value`.
### Placeholders in the Custom Redirect
You can use placeholders in the custom redirect that are replaced by metadata.
To use a specified metadata in the custom redirect, add it in curly braces, e.g., `{{metadataKey}}`.
If you operate a multi-tenant application and want to redirect to a custom URL of the tenant upon redirect,
you can attach the tenant ID as metadata to the checkout link and use it as a placeholder in the custom redirect.
Example URL: `https://{{tenantId}}.example.com/checkout-success`
Example Checkout URL: `https://fynn.coreapi.io/checkout-link/xxxxxx?metadata[tenantId]=acmegmbh`
### Webhooks
The metadata is passed in the webhook as the `metadata` field.
```json theme={null}
{
"metadata": {
"key": "value",
"key2": "value2"
}
}
```
## Create Checkout Session
By default, a new checkout session is created when using the checkout link.
However, it may be useful to create only one checkout session if you:
* want to bundle multiple products in one cart
* want to use the checkout link multiple times
To create a checkout session, add the parameter `session=true`, e.g., `https://my-tenant.coreapi.io/checkout-link/xxxxxxxx?session=true`.
If a checkout session has been created and a checkout link is called without `session=true`, a one-time independent checkout session is created.
The checkout session is valid for 24 hours. After this time, the cart is cleared.
### Retrieve Checkout Session
To retrieve the checkout session without adding another product, call the following
API route: `https://[tenant-username].coreapi.io/public/checkout/cart/current`. Replace `[tenant-username]` with your tenant name.
You will then be redirected to the current checkout session.